
Introduction
This class is rather difficult for a large portion of the game (level 1-40), but that being said, it more than pays off afterwards. This class is the mitigation tank, you will have undefeatable damage reduction however you will deal less damage and will have a tougher time maintaining enmity levels but after level 40 this is rarely a problem. Paladin can easily be too difficult for less skilled players before level 40 so I don’t recommend this as your first tank if you aren’t very skilled. However if you are persistent it is possible.
Requirements
Gladiator Level 30, Conjurer Level 15
The Basics of Tanking
Here are some things to know before you start tanking
Enmity
This game calls the enemy attention mechanic “enmity”. You may know this as hate, aggro, threat, rage, etc. Enmity generation is your first and foremost duty, then damage reduction, and then damage dealing. Now enmity generation is tied to damage dealt, but they are not the same thing. There are moves which provide enmity bonuses which means they produce some multiplier of enmity for the damage. So damage is important, but these abilities are more so.
This is how enmity works so you understand. I shall use a single unit of damage/healing to show perspective
1 damage = 1 enmity point
1 damage from an enmity bonus attack = 1 x multiplier enmity points
Multiplier list: https://www.reddit.com/r/ffxiv/wiki/enmity
1 healing = 0.5 enmity points to all enemies that are currently engaged by that target
You must stay at least 1 point of enmity above all players on all targets (hopefully more than that) for the targets to remain attacking you. Current enmity totals are shown (although not numerically) in two areas.
The first is detailed for a single target. With a target selected, you can view who has how much enmity in the party window. This will also let you know who is closest and by how much. This will inform your enmity generation and dps decisions.
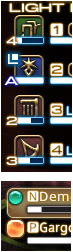
The second is the enemy list. If you have an orange square for all of them, you are golden. If you have anything else (especially that green circle), you need to attack that target IMMEDIATELY and bring the enemy back to you.
This class is rather difficult for a large portion of the game (level 1-40), but that being said, it more than pays off afterwards. This class is the mitigation tank, you will have undefeatable damage reduction however you will deal less damage and will have a tougher time maintaining enmity levels but after level 40 this is rarely a problem. Paladin can easily be too difficult for less skilled players before level 40 so I don’t recommend this as your first tank if you aren’t very skilled. However if you are persistent it is possible.
Requirements
Gladiator Level 30, Conjurer Level 15
The Basics of Tanking
Here are some things to know before you start tanking
Enmity
This game calls the enemy attention mechanic “enmity”. You may know this as hate, aggro, threat, rage, etc. Enmity generation is your first and foremost duty, then damage reduction, and then damage dealing. Now enmity generation is tied to damage dealt, but they are not the same thing. There are moves which provide enmity bonuses which means they produce some multiplier of enmity for the damage. So damage is important, but these abilities are more so.
This is how enmity works so you understand. I shall use a single unit of damage/healing to show perspective
1 damage = 1 enmity point
1 damage from an enmity bonus attack = 1 x multiplier enmity points
Multiplier list: https://www.reddit.com/r/ffxiv/wiki/enmity
1 healing = 0.5 enmity points to all enemies that are currently engaged by that target
You must stay at least 1 point of enmity above all players on all targets (hopefully more than that) for the targets to remain attacking you. Current enmity totals are shown (although not numerically) in two areas.
The first is detailed for a single target. With a target selected, you can view who has how much enmity in the party window. This will also let you know who is closest and by how much. This will inform your enmity generation and dps decisions.
The second is the enemy list. If you have an orange square for all of them, you are golden. If you have anything else (especially that green circle), you need to attack that target IMMEDIATELY and bring the enemy back to you.
Cool Downs
As a tank your damaging abilities will be few and simple for a large portion of the game, so managing your cool downs and your resources is the larger focus. You will want to spread out your cool downs to create a study stream of damage reduction for your healer. Spiking cool downs results in wasteful over kill with long dry periods and will mess with the healers perception of your toughness. This is dangerous because the healer overestimating what you can take usually ends with you dead, which usually leads to a wipe.
Resources TP/MP
Your other focus in tanking will be resources. Run dry and you lose control of the fight, but fear not, it is not an overly complicated task.
As a PLD you pull from both TP and MP. Using TP single target attacks and your stun, and mp for your aoe enmity and later healing (or stoneskin if you had leveled a WHM to lvl 34). MP can be restored through the secondary combo so don’t worry about using it all on flash as it has no other use for a long time, but keep your mp around 30-50% ideally and try to top it off at the end of a fight to make transitions between fights fluid. Tp should not be a large concern, just temper your stun usage and shield lobs to necessity or moderation.
Numbering
Numbering your targets will make your life infinitely easier as a tank. It gives the party an exact order to follow, allowing you to plot your enmity distributions effectively. Also, if you lose enmity to a target that does not follow the list order to a dps who is dealing single target damage, you can absolve yourself of fault and end any fuss in the party quickly.
You should number your targets in order of what complicates the fight the most or the quickest to kill first, followed by less pressing targets. You shouldn’t usually need more than 3 numbers, but you’ll need at least two to designate current and next target for the party.
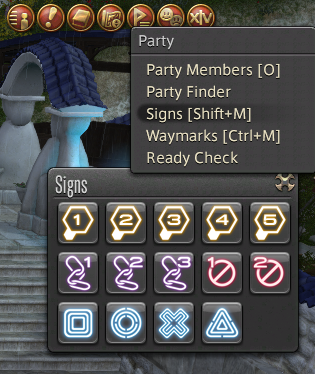
The numbers can be found in the party menu>signs
Abilities, Combos, and Execution
Here we will review in sections the various abilities you will have, how you should use them, and how they will change your playstyle. A list of the specific details of the abilities can be viewed Here and Here. Note what I consider to be a cool down constitutes a buffing action and longer recast time of 60 or more seconds. Attacks and single use buffs with shorter recast time, I consider to be Off GCD abilities and are included in the main sections. You may disagree with these definitions, but that is how the format of the following is written. Key abilities are described in their own sections for clarity of function and purpose.
Flash
Flash is a very different ability from all others so it requires an explanation. Flash gives a fixed (no fluctuation like damage) amount of enmity based on level in a small circular aoe with an additional accuracy debuff. This ability is very unique, as well as somewhat weak. Flash deals no damage so you don’t have to worry about undoing bind or sleep with it and the accuracy debuff is somewhat a form of damage reduction.
Flash should be repeated throughout the fight to maintain aoe enmity if you are struggling, someone is not following order, or aoe attacks are being used. Use in the center of the monsters you would like to affect. Spread it out, using after every other combo or every combo if necessary.
Provoke
Provoke is a very key mechanic in saving yourself from your mistakes and tank swapping (a key mechanic in many later fights). Provoke will place your enmity on a single target 1 enmity point higher than its current highest target. If you lose enmity, use this ability to bring it back to you and swiftly use a ranged or melee enmity attack on it (macroing your ranged enmity attack to this skill is advisable and will be available in the macros section). THIS ABILITY IS NOT AN ENMITY GENERATOR, it is an enmity steal. Using this ability to pull in a ranged target that is not engaged is the same as 1 damage which won’t hold over anything (if an ally is engaged and uses just a buff they will pull off you). Using this ability on a target on which you already have lead enmity will give you 1 enmity point. There is NO POINT in using this EXCEPT for stealing enmity back to you from another player.
Cross Class
Recommended:
Foresight-Another defense cool down to add to the mix. You cannot go wrong adding to your armory of cool downs to help the healers and add to your mitigation.
Bloodbath-Additionally free healing with a shorter cool down, although not a game changer, it's useful and helpful.
Stoneskin-you can cast on yourself between fights to give your healer a buffer for dpsing, use when a big hit is coming, or when soloing as a sort of heal.
Good Choices:
Fracture-cant go wrong with a dot, although a weak one this is still damage that your lacking in most of content.
Mercy Stroke-additional damage and if you are good at timing, a 20% heal.
Protect-good for when your healer isnt reapplying after death or for solo play.
Bad Choices:
Cure-cure is based off of your mind stat. Nothing about Paladin adds to mind so your cures are nigh negligible. Stoneskin will give you much more bang for your mp for most levels except maybe pre 20.
Skull Sunder- you don't need it, you have your own enmity moves.
Raise- you can only use this out of combat, you’ll most probably not have enough mp to use it at low level and it is so situational it's a waste.
Level 1-30 Bread and Butter
The basic initiator:
Shield Lob>Flash>Flash
Strategy: Ranged pull so ranged units may start attacking immediately and the first target is clear. This also prevents you from having to walk all the way to group, as well as starts off with an enmity generator (as fast blade is not).
Primary combo:
Fast Blade>Savage Blade>Rage of Halone (lvl 26)
Strategy: Builds enmity, consider alternating your target as you progress through combo to spread enmity around to targets, instead of wasting away mp on, or use in conjunction with, repetitive flashing (as described in flash section).
Secondary Combo:
Fast Blade>Riot Blade[>Goring Blade (lvl 54)]
Strategy: This is your mp restore combo which can be used if your enmity is well established but also remain unused if you are managing enmity and mp/flash well. Incorporating the alternating target strategy with this combo is also viable for maintaining enmity on multiple targets. Remember damage is still enmity just less of it. This combo does more damage up to level 26, at which point your primary combo with Rage of Halone is more damage and enmity. At level 54 this combo becomes a DOT application combo. The DOT makes the damage of the combo higher damage, but only the DOT does, the combo is slightly weaker in direct damage than your primary combo. So again MP and DOT(post lvl 54) combo ONLY (post lvl 26).
Rampart
See Unrestricted Cool Downs section
Flight or Fight
See Unrestricted Cool Downs section
Shield Bash
Strategy: This stun will interrupt most anything, has only a Global Cooldown, but does cost a pretty penny in TP and is locked in Global Cool Down. So you should use it as an interrupt, and can use it for damage reduction (although 3s is very short for all that TP); HOWEVER note that stun resistance builds on a target. You can stun a target 3 times (for half duration of the previous stun time) until it will have no effect including no interrupt.
Shield Swipe
Strategy: This bad boy should be used whenever its up! Free dps and enmity? Why yes I’ll take that, thank you. It can be an interrupt on enemy WEAPONSKILLS (physical trash abilities) but will rarely interrupt a boss ABILITY or SPELL. The distinction is important. So mostly this is a source of dps and enmity and in some cases damage reduction.
Paladin! Level 30-60
Sword Oath
Strategy: DPS mode for Off Tanking and when you are by yourself. Do have it on all the time before you have shield oath, as the damage does help with enmity (not much but better than nothing).
Awareness
See Unrestricted Cool Downs section
Cover
See Restricted Cool Downs section
Sentinel
See Restricted Cool Downs section
Shield Oath
Strategy: First of all, Praise your gods for your tanking mode has finally arrived! You should always have this up unless you are not main tanking. You deal 20% less damage but get 100% more enmity from all your attacks and receive 20% less damage. ALWAYS HAVE ON. [There is dps optimization where you leave tank stance after establishing aggro. In easy content it doesnt matter, however I disagree with the use of this tactic in difficult content unless your healer has the healing down pat.]
Tempered Will
See Restricted Cool Downs section
Spirits Within
Strategy: Welcome to being a master tank. You now possess all three forms of interruption, pacification (unique to you) for weapon skill, silence for spells, and stun for everything. There is no such thing as silence resist so you are good to interrupt as much as you like with this one, HOWEVER the Cool Down does not permit the free use of this. If facing an opponent that needs a silence interrupt, save this ability for those moments. Otherwise free dps, use whenever it’s up.
Bulwark
See Restricted Cool Downs section
Hallowed Ground
See Restricted Cool Downs section
Circle of Scorn
Strategy: This is the answer to your aoe enmity prayers. Use this rather large aoe DOT in the center of a group. This will allow you to cut down on flash usage but not completely eliminate it. Use this whenever it is up as it is always free dps (and enmity by extension).
Sheltron
Strategy: Damage block, mp restore, off GCD and short recast time? This ability is almost too good to be true. Use this at your discretion, which maybe every time it is up, or saved for certain attacks (thought they must be physical). Using this ability whenever it is up is advisable.
Goring Blade is added to your MP/DOT combo
Divine Veil
See Restricted Cool Downs section
Clemency
Strategy: This is the point where Paladin feels true to its nature, you now have a viable heal. This heal will heal you for half of it heals another player, so if the healers are struggling help em out. Healing also spreads enmity to all engaged targets for half value, but you have +100% enmity generation, so this move is somewhat a form of boundless aoe enmity. Although not the main purpose, it is a use to keep in mind. The heal will be weak though, so keep that in mind as well, but something is better than nothing.
DPS Combo
Fast Blade>Savage Blade>Royal Authority
Strategy: You now possess a true spammable dps combo for when your dot and enmity is up all around. The damage is excellent so if enemies are low don’t bother with the DOT and use this
Unrestricted Cool Downs
Rampart
You can use this Cool Down in every fight as a damage reduction help for the healers.
Flight or Fight
You should use this every fight to help boost dps and enmity
Awareness
This a lower Cool Down ability, but honestly it is kinda useless. Enemies do not crit that often, but you may use it all the same as “damage reduction”.
Restricted Cool Downs
Cover
Save this for when you or someone else screws up and someone is taking punishment that can’t take much. It will transfer a good portion of the damage to your beefy health bar and makes things easier to recover from.
Sentinel
This is powerful damage reduction and I recommend saving for when things are getting hairy but you can use it if a boss is still far off.
Tempered Will
This is incredibly situational and should be used to free yourself of any slow or to stop yourself from being moved by mechanics. Useful if you screwed up in something similar to a titan punch and pop it real quick.
Bulwark
This is both a dps and defense boost. The blocks will increase shield bash frequency, increasing damage and enmity. You can use this at your own discretion but it is a useful damage reduction tool. The cool down would incline myself personally to save it.
Hallowed Ground
This is your panic skill, when you're about to die, use this.
Divine Veil
This ability should be used when there is aoe damage going out or a person close to you is going to die. Your healer will be grateful for the free shielding, but don’t waste it. You cannot activate the shield yourself so someone else has to heal you to activate the shield.
As a tank your damaging abilities will be few and simple for a large portion of the game, so managing your cool downs and your resources is the larger focus. You will want to spread out your cool downs to create a study stream of damage reduction for your healer. Spiking cool downs results in wasteful over kill with long dry periods and will mess with the healers perception of your toughness. This is dangerous because the healer overestimating what you can take usually ends with you dead, which usually leads to a wipe.
Resources TP/MP
Your other focus in tanking will be resources. Run dry and you lose control of the fight, but fear not, it is not an overly complicated task.
As a PLD you pull from both TP and MP. Using TP single target attacks and your stun, and mp for your aoe enmity and later healing (or stoneskin if you had leveled a WHM to lvl 34). MP can be restored through the secondary combo so don’t worry about using it all on flash as it has no other use for a long time, but keep your mp around 30-50% ideally and try to top it off at the end of a fight to make transitions between fights fluid. Tp should not be a large concern, just temper your stun usage and shield lobs to necessity or moderation.
Numbering
Numbering your targets will make your life infinitely easier as a tank. It gives the party an exact order to follow, allowing you to plot your enmity distributions effectively. Also, if you lose enmity to a target that does not follow the list order to a dps who is dealing single target damage, you can absolve yourself of fault and end any fuss in the party quickly.
You should number your targets in order of what complicates the fight the most or the quickest to kill first, followed by less pressing targets. You shouldn’t usually need more than 3 numbers, but you’ll need at least two to designate current and next target for the party.
The numbers can be found in the party menu>signs
Abilities, Combos, and Execution
Here we will review in sections the various abilities you will have, how you should use them, and how they will change your playstyle. A list of the specific details of the abilities can be viewed Here and Here. Note what I consider to be a cool down constitutes a buffing action and longer recast time of 60 or more seconds. Attacks and single use buffs with shorter recast time, I consider to be Off GCD abilities and are included in the main sections. You may disagree with these definitions, but that is how the format of the following is written. Key abilities are described in their own sections for clarity of function and purpose.
Flash
Flash is a very different ability from all others so it requires an explanation. Flash gives a fixed (no fluctuation like damage) amount of enmity based on level in a small circular aoe with an additional accuracy debuff. This ability is very unique, as well as somewhat weak. Flash deals no damage so you don’t have to worry about undoing bind or sleep with it and the accuracy debuff is somewhat a form of damage reduction.
Flash should be repeated throughout the fight to maintain aoe enmity if you are struggling, someone is not following order, or aoe attacks are being used. Use in the center of the monsters you would like to affect. Spread it out, using after every other combo or every combo if necessary.
Provoke
Provoke is a very key mechanic in saving yourself from your mistakes and tank swapping (a key mechanic in many later fights). Provoke will place your enmity on a single target 1 enmity point higher than its current highest target. If you lose enmity, use this ability to bring it back to you and swiftly use a ranged or melee enmity attack on it (macroing your ranged enmity attack to this skill is advisable and will be available in the macros section). THIS ABILITY IS NOT AN ENMITY GENERATOR, it is an enmity steal. Using this ability to pull in a ranged target that is not engaged is the same as 1 damage which won’t hold over anything (if an ally is engaged and uses just a buff they will pull off you). Using this ability on a target on which you already have lead enmity will give you 1 enmity point. There is NO POINT in using this EXCEPT for stealing enmity back to you from another player.
Cross Class
Recommended:
Foresight-Another defense cool down to add to the mix. You cannot go wrong adding to your armory of cool downs to help the healers and add to your mitigation.
Bloodbath-Additionally free healing with a shorter cool down, although not a game changer, it's useful and helpful.
Stoneskin-you can cast on yourself between fights to give your healer a buffer for dpsing, use when a big hit is coming, or when soloing as a sort of heal.
Good Choices:
Fracture-cant go wrong with a dot, although a weak one this is still damage that your lacking in most of content.
Mercy Stroke-additional damage and if you are good at timing, a 20% heal.
Protect-good for when your healer isnt reapplying after death or for solo play.
Bad Choices:
Cure-cure is based off of your mind stat. Nothing about Paladin adds to mind so your cures are nigh negligible. Stoneskin will give you much more bang for your mp for most levels except maybe pre 20.
Skull Sunder- you don't need it, you have your own enmity moves.
Raise- you can only use this out of combat, you’ll most probably not have enough mp to use it at low level and it is so situational it's a waste.
Level 1-30 Bread and Butter
The basic initiator:
Shield Lob>Flash>Flash
Strategy: Ranged pull so ranged units may start attacking immediately and the first target is clear. This also prevents you from having to walk all the way to group, as well as starts off with an enmity generator (as fast blade is not).
Primary combo:
Fast Blade>Savage Blade>Rage of Halone (lvl 26)
Strategy: Builds enmity, consider alternating your target as you progress through combo to spread enmity around to targets, instead of wasting away mp on, or use in conjunction with, repetitive flashing (as described in flash section).
Secondary Combo:
Fast Blade>Riot Blade[>Goring Blade (lvl 54)]
Strategy: This is your mp restore combo which can be used if your enmity is well established but also remain unused if you are managing enmity and mp/flash well. Incorporating the alternating target strategy with this combo is also viable for maintaining enmity on multiple targets. Remember damage is still enmity just less of it. This combo does more damage up to level 26, at which point your primary combo with Rage of Halone is more damage and enmity. At level 54 this combo becomes a DOT application combo. The DOT makes the damage of the combo higher damage, but only the DOT does, the combo is slightly weaker in direct damage than your primary combo. So again MP and DOT(post lvl 54) combo ONLY (post lvl 26).
Rampart
See Unrestricted Cool Downs section
Flight or Fight
See Unrestricted Cool Downs section
Shield Bash
Strategy: This stun will interrupt most anything, has only a Global Cooldown, but does cost a pretty penny in TP and is locked in Global Cool Down. So you should use it as an interrupt, and can use it for damage reduction (although 3s is very short for all that TP); HOWEVER note that stun resistance builds on a target. You can stun a target 3 times (for half duration of the previous stun time) until it will have no effect including no interrupt.
Shield Swipe
Strategy: This bad boy should be used whenever its up! Free dps and enmity? Why yes I’ll take that, thank you. It can be an interrupt on enemy WEAPONSKILLS (physical trash abilities) but will rarely interrupt a boss ABILITY or SPELL. The distinction is important. So mostly this is a source of dps and enmity and in some cases damage reduction.
Paladin! Level 30-60
Sword Oath
Strategy: DPS mode for Off Tanking and when you are by yourself. Do have it on all the time before you have shield oath, as the damage does help with enmity (not much but better than nothing).
Awareness
See Unrestricted Cool Downs section
Cover
See Restricted Cool Downs section
Sentinel
See Restricted Cool Downs section
Shield Oath
Strategy: First of all, Praise your gods for your tanking mode has finally arrived! You should always have this up unless you are not main tanking. You deal 20% less damage but get 100% more enmity from all your attacks and receive 20% less damage. ALWAYS HAVE ON. [There is dps optimization where you leave tank stance after establishing aggro. In easy content it doesnt matter, however I disagree with the use of this tactic in difficult content unless your healer has the healing down pat.]
Tempered Will
See Restricted Cool Downs section
Spirits Within
Strategy: Welcome to being a master tank. You now possess all three forms of interruption, pacification (unique to you) for weapon skill, silence for spells, and stun for everything. There is no such thing as silence resist so you are good to interrupt as much as you like with this one, HOWEVER the Cool Down does not permit the free use of this. If facing an opponent that needs a silence interrupt, save this ability for those moments. Otherwise free dps, use whenever it’s up.
Bulwark
See Restricted Cool Downs section
Hallowed Ground
See Restricted Cool Downs section
Circle of Scorn
Strategy: This is the answer to your aoe enmity prayers. Use this rather large aoe DOT in the center of a group. This will allow you to cut down on flash usage but not completely eliminate it. Use this whenever it is up as it is always free dps (and enmity by extension).
Sheltron
Strategy: Damage block, mp restore, off GCD and short recast time? This ability is almost too good to be true. Use this at your discretion, which maybe every time it is up, or saved for certain attacks (thought they must be physical). Using this ability whenever it is up is advisable.
Goring Blade is added to your MP/DOT combo
Divine Veil
See Restricted Cool Downs section
Clemency
Strategy: This is the point where Paladin feels true to its nature, you now have a viable heal. This heal will heal you for half of it heals another player, so if the healers are struggling help em out. Healing also spreads enmity to all engaged targets for half value, but you have +100% enmity generation, so this move is somewhat a form of boundless aoe enmity. Although not the main purpose, it is a use to keep in mind. The heal will be weak though, so keep that in mind as well, but something is better than nothing.
DPS Combo
Fast Blade>Savage Blade>Royal Authority
Strategy: You now possess a true spammable dps combo for when your dot and enmity is up all around. The damage is excellent so if enemies are low don’t bother with the DOT and use this
Unrestricted Cool Downs
Rampart
You can use this Cool Down in every fight as a damage reduction help for the healers.
Flight or Fight
You should use this every fight to help boost dps and enmity
Awareness
This a lower Cool Down ability, but honestly it is kinda useless. Enemies do not crit that often, but you may use it all the same as “damage reduction”.
Restricted Cool Downs
Cover
Save this for when you or someone else screws up and someone is taking punishment that can’t take much. It will transfer a good portion of the damage to your beefy health bar and makes things easier to recover from.
Sentinel
This is powerful damage reduction and I recommend saving for when things are getting hairy but you can use it if a boss is still far off.
Tempered Will
This is incredibly situational and should be used to free yourself of any slow or to stop yourself from being moved by mechanics. Useful if you screwed up in something similar to a titan punch and pop it real quick.
Bulwark
This is both a dps and defense boost. The blocks will increase shield bash frequency, increasing damage and enmity. You can use this at your own discretion but it is a useful damage reduction tool. The cool down would incline myself personally to save it.
Hallowed Ground
This is your panic skill, when you're about to die, use this.
Divine Veil
This ability should be used when there is aoe damage going out or a person close to you is going to die. Your healer will be grateful for the free shielding, but don’t waste it. You cannot activate the shield yourself so someone else has to heal you to activate the shield.

Macros and UI Help
Do not rapidly press macro buttons, this will start them over and over and will screw up many of their workings. Macros also do not work with forgiveness zones, meaning pushing it .25 seconds from when Global Cool Down is over, will not push the action through. Global Cool Down must finish completely before a macro (that uses an on GCD ability) can be processed, making them slightly slower (cool downs and off gcds function fine). A well-controlled use of hotkeys is needed for macros, otherwise they are diminished. Furthermore macros can at shortest work in terms of half seconds, anything shorter will cause abilities to not go off.
To be more aware of when your Cool Downs are Available for use again consider one of the two following methods
Visual (PC): enter your HUD layout through the system menu. Place a hot bar nearer to the center of your screen but far enough away you have enough visual space to see your character. Make this hot bar larger using CTRL+HOME. In this bar place a secondary icon of the abilities you wish to know the availability of, whether they be Cool Downs, Off GCDs, or Procs. The following is an example.
Audio: Use a macro on the ability to inform you when its cool down has passed.
/macroicon “Ability”
/ac “Ability”
/wait # (put the recast time in seconds or a few second short to warn you early for reaction time)
/e Ability is ready <se.#> (pick a number for the sound effect you desire)
You’ll need to replace quotes “ “ in game
Paladin MacrosShield Lob + Provoke combo
/macroicon Provoke
/ac Provoke <wait..5>
/ac “Shield Lob”
Silence announcement (For Raid clarity)
/macroicon “Spirits Within”
/ac “Spirits Within”
/p Silence Used <se.10>
Flash + Circle of scorn Combo (COS is icon to let you know when it back up, and it looks cooler =P)
/macroicon “Circle of Scorn”
/ac Flash
/wait .5
/ac “Circle of Scorn”
Lazy Unrestricted Cool Downs (Will autocast most of your cooldowns on use of fast blade [most common attack], for those you don’t care to save. HOWEVER only one will be cast per use of fast blade. Remove or add as many abilities to the list as you want.
/macroicon “Fast Blade”
/ac “Fast Blade” <wait..5>
/ac “Fight or Flight”
/ac Rampart
/ac Sheltron
/ac “Circle of Scorn”
/ac Awareness
Divine Veil announcement
/macroicon “Divine Veil”
/ac “Divine Veil”
/p Divine Veil used. Hit me with a heal for shield <se.10>
