
Introduction
Black Mage is a hard hitting caster with longer cast times and mp management skills. The class utilizes a simple concept of a very literal burn phase complimented by a regenerative phase, cycling these with flawless execution to attain powerful damage on a single target and, as any true caster, area of effect devastation. Black Mage unlike any other DPS is immune to resource depletion in the traditional sense as it depletes and restores it own resource constantly. This being said poor management of the DPS cycle will result in resource crunches that further result in DPS drops. Black Mage demands a larger attention span than the other dps to your resource and aggro as both must be balanced. But fear not this is a skill which will be drilled in to you during your time as a Black Mage, so you shall learn.
Black Mage is a hard hitting caster with longer cast times and mp management skills. The class utilizes a simple concept of a very literal burn phase complimented by a regenerative phase, cycling these with flawless execution to attain powerful damage on a single target and, as any true caster, area of effect devastation. Black Mage unlike any other DPS is immune to resource depletion in the traditional sense as it depletes and restores it own resource constantly. This being said poor management of the DPS cycle will result in resource crunches that further result in DPS drops. Black Mage demands a larger attention span than the other dps to your resource and aggro as both must be balanced. But fear not this is a skill which will be drilled in to you during your time as a Black Mage, so you shall learn.
Requirements
Thaumaturge Level 30, Archer level 15
Thaumaturge Level 30, Archer level 15
Face Your Target
Offensive spells in this game require you to be facing your target, or they will go the whole cast right up to the end only to cancel themselves. To fix for a target moving away from the direction your are facing press "F" on PC or create a macro hotkey for PS 3/4 with the text /facetarget. Alternatively, you may rotate your character as well, but this does not have anywhere near the recovery success rate as using the facetarget command.
Offensive spells in this game require you to be facing your target, or they will go the whole cast right up to the end only to cancel themselves. To fix for a target moving away from the direction your are facing press "F" on PC or create a macro hotkey for PS 3/4 with the text /facetarget. Alternatively, you may rotate your character as well, but this does not have anywhere near the recovery success rate as using the facetarget command.
Crowd Control, Interrupts, Adds, Utility
As a caster you are given two crowd control abilities and an additional semi-control. Your two crowd controls are sleep (becomes aoe at level 36) and blizzard 2(not really)/freeze (level 35). True crowd control is canceled by active damage, a new attack that deals damage will awaken the sleeping, or free the bound, unit. Use sleep to turn off an enemy entirely, but note many enemies in the later game are immune to this effect. Utilizing sleep will aid your healer and allow a more controlled combat, with less chance of error by any role. Bind is highly situational. I recommend it to lock up melee enemies that are immune to sleep, the tank simply walks out of range and they are no longer a worry. This will more often be used for pinning a target that the tank lost control of and is followed by running away from it. Crowd control is EXTREMELY under utilized in this game as it takes cunning to know when best to use it, so unless clarifying with your group first, or even after unfortunately, they will often break your CC. You also have semi control with blizzard spells and lethargy inflicting heavy, although much more useful in pvp, heavy can slow enemies enough that they can't attack another target if the tank loses enmity before he reestablishes. Heavy however in PVE content is not something you seek to apply unless you are soloing.
Interrupting is kinda possible with BLM to many peoples surprise but not on every enemy. Sleep can be used as a casted "stun" kind of mechanic, however the skill, premptiveness and highly situational nature makes this unreliable but it is something you should be aware of and I recommend you experiment with this.
As a DPS your main duty is to remove "adds" or additional enemies from the fight. If its a boss fight and there is something that spawned other than a boss, there is a 95% chance you are supposed to kill it, so do it. Burning the boss has become a common strategy for most content and is ill advised unless the group is overgeared or has very high DPS. Killing adds secures victory free of risk, leaving them around may save time in some fights but mistakes pile and if someone dies the fight will take longer than if you just killed them in the first place. Make sure you dont become a tunnel-vision DPS who only attacks the biggest target; the game will reward you with a lot of laying down during fights if you do.
As a Black mage you posses damage shielding abilities for yourself which I recommend macroing together. Utilize these when an inevitable hit is headed your way to help out the healer. Apocatastasis is also a buff you should place on the tank to help with magic damage during such fights where that damage is dealt. As a black mage, you may also cross class physic, virus and eye for an eye to help even further in a support role while pulling out the big DPS numbers

Enmity
This game calls the enemy attention mechanic “enmity”. You may know this as hate, aggro, threat, rage, etc. Enmity generation is also your concern as a healer. Now enmity generation is tied to damage dealt and healing, but they are not the same thing. There are moves which provide enmity bonuses which means they produce double the enmity for the damage.
This is how enmity works so you understand. I shall use a single unit of damage/healing to show perspective
1 damage = 1 enmity point
1 damage from an enmity bonus attack = 2 enmity points
1 healing = 0.5 enmity points to all enemies that are currently engaged by that target
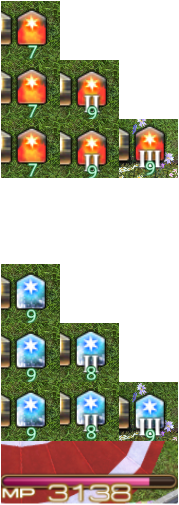
You must avoid reaching above the tanks enmity as much as possible. Current enmity totals are shown (although not numerically) in two areas.
The first is detailed for a single target. With a target selected, you can view who has how much enmity in the party window. This will also let you know who is closest and by how much. This will inform your enmity generation and dps decisions.
The second is the enemy list. If you have an green circle for all of them, you are golden. If you have an orange triangle or square then you should not be dpsing that target anymore and you can even mark the enemy or use a macro to let the tank know they lost enmity
This game calls the enemy attention mechanic “enmity”. You may know this as hate, aggro, threat, rage, etc. Enmity generation is also your concern as a healer. Now enmity generation is tied to damage dealt and healing, but they are not the same thing. There are moves which provide enmity bonuses which means they produce double the enmity for the damage.
This is how enmity works so you understand. I shall use a single unit of damage/healing to show perspective
1 damage = 1 enmity point
1 damage from an enmity bonus attack = 2 enmity points
1 healing = 0.5 enmity points to all enemies that are currently engaged by that target
You must avoid reaching above the tanks enmity as much as possible. Current enmity totals are shown (although not numerically) in two areas.
The first is detailed for a single target. With a target selected, you can view who has how much enmity in the party window. This will also let you know who is closest and by how much. This will inform your enmity generation and dps decisions.
The second is the enemy list. If you have an green circle for all of them, you are golden. If you have an orange triangle or square then you should not be dpsing that target anymore and you can even mark the enemy or use a macro to let the tank know they lost enmity
Abilities, Combos, and Execution
Here we will review in sections the various abilities you will have, how you should use them, and how they will change your playstyle. A list of the specific details of the abilities can be viewed Here and Here. Note what I consider to be a cool down constitutes a buffing action and longer recast time of 60 or more seconds. Attacks and single use buffs with shorter recast time, I consider to be Off GCD abilities and are included in the main sections. You may disagree with these definitions, but that is how the format of the following is written. Key abilities are described in their own sections for clarity of function and purpose.
Here we will review in sections the various abilities you will have, how you should use them, and how they will change your playstyle. A list of the specific details of the abilities can be viewed Here and Here. Note what I consider to be a cool down constitutes a buffing action and longer recast time of 60 or more seconds. Attacks and single use buffs with shorter recast time, I consider to be Off GCD abilities and are included in the main sections. You may disagree with these definitions, but that is how the format of the following is written. Key abilities are described in their own sections for clarity of function and purpose.
Transpose
Transpose will transition your stacks of Astral fire or Umbral ice into the first level of the inverse buff and is off global cool down so its not replacing a cast. Regardeless if you are at Astral fire 3 or Umbral ice 3 transpose will only bring to Umbral ice 1 or Astral fire 1, respectively. If you have no stacks of either, it will do nothing and will still go on cool down, being a complete waste. Transpose, when switching your buff counts as a true gain, meaning that it will give the full duration. For example, say you have completed a fight and are at half mana with one second left on Astral fire 1/2/3, the use of transpose will give you a full 10 seconds of Umbral ice. This example is two fold as you should always perform a transition to Umbral Ice between combat to restore mp to full unless your mp is already full.
Transpose will be a vital tool for recovering MP and transitioning from Astral fire to Umbral ice, I do not recommend performing the inverse however. If used properly and your regenerative phase is prompt, then such will not be possible regardless.
Astral and Umbral, Being a Black Mage
The most key concept of Black Mage is the management of Astral fire and Umbral Ice in conjunction with MP.
Astral fire builds with fire spells and is your "burn" phase. It improves the damage of fire spells and their cost with each stack, while reducing the cost of blizzard spells. Maintain maximum stacks of astral fire for the entirety of the burn phase and end with enough MP to cast a blizzard spell without the astral fire cost reduction until you can use Blizzard 3. Use transpose at the end of this phase and begin casting blizzard spells into your "regenerative phase". Emptying MP in "burn" phase will cause casting delays that will ruin your DPS and is a horrible habit to build. Don't do it.
Umbral ice restores MP over time and is achieved through blizzard spells. This is your "regenerative" phase. It will be brief but will change the most during your experience as a black mage. In your regenerative phase you will always desire to use one blizzard spell. The next step is dependent on situation and level you are at. Return to "burn" phase upon full MP.
Astral and Umbral 3 (level 40)
Astral fire 3 and Umbral ice 3 are attainable at level 40 and dramatically change your play. Transpose becomes an accident fix until level 50 at this point. Through the use of fire 3 and blizzard 3 you may quickly switch between full stacks of either buff. Beginning, in burn phase you may burn down your mp til you have just enough mp to cast Blizzard 3. Astral fire 3 in addition to the previous effects now on top of reducing blizzard spell cost also halves the cast time; allowing transition between phases to be flawless. This strategy of reduced cast times may be utilized during highly mobile combat to keep full stacks of the buff. Utilize an alternating pattern of switching between fire 3 and blizzard 3 to prevent a "hard" (full) cast later in the fight. If the fight is supremely mobile utilize scathe during the most intense phases of telegraphs, and thunder 1/2/3 depending on cast time allowed as well. Try to always be putting out some kind of damage, and do everything to prevent a hard cast of fire or blizzard 3.
Cross Class
Recommended:
Raging Strikes-Huge damage boost and fairly low cool down considering, pop after fire 3 in your burn phase
Quelling Strikes- This will help you not pull enmity when you use Raging Strikes, unless the tank is secure in enmity by a LARGE gap use this in conjunction with Raging Strikes.
Good:
Phsyic-allows you to help with healing when things get hairy but by no means is a game changer, its just helpful for when things go bad. As a blm in umbral ice you can cast this infinitely so its not going to ruin you either.
Eye for an Eye- Super Useful to the healer if you use this on the tanks in boss fights (after they use their or if you coordinate). Use in conjunction with Apocatastasis to maximize damage reduction for the target
Virus- Useful for reducing physical damage from a target in both solo and party play. The short cool down allows you to use it pretty often so feel free in trash fights
Bad:
Ruin- there is no point to cross class this, your better off using a blizzard or thunder
Hawk's eye- you never really miss in this game, and dexterity does nothing for you (technically increases your dodge rate but its a waste of a cross class)
Thaumaturge (Level 1-30)
Single target combo
Fire 1*(til enough mp for full cost blizzard)*>Transpose>Blizzard 1>Blizzard 1 or Scathe>Repeat
Thunder
Strategy: Do not bother with this spell or there is unique strategy at end keep reading. Its damage is not worth amount of time it takes to cast and deal over time, nor the delays it causes in your rotations. Its only use is to slow down your damage as to let a tank better establish enmity before you unleash your full strength. HOWEVER some blm choose to use this thunder for its shorter cast time(especially with level 60 rotations) and only use higher thunders with thunder cloud (described later). Consider this if you wish to use it.
Sure Cast
Refer to Unrestricted Cool Downs
Sleep
Strategy: use to place most targets into an inactive state. A damage ability will undo this, but an already applied DOT will not. This will help healers out in dungeons, and you can use this to manage targets in solo play (or simply sleep them all and run away). Becomes an AOE at level 36.
Blizzard 2
Strategy: Do not bother with this spell either. It has horrible damage and requires you to close to melee range. Its use would be to pin a target or group of targets so you can run away.
Scathe
Strategy: use when mobility is required to sustain damage or as quick hit to finish off very low health enemies.
Aoe Combo
Fire 2*>Transpose>Blizzard 1>Blizzard 1 or Scathe>Repeat
Thunder 2
Strategy: use as filler during regenerative phase after thundercloud becomes available. Completely replaces all uses of Thunder. Place on targets other than the primary to get the full damage out of it unless the target has 80% health remaining or is a boss.
Swiftcast
See Restricted Cool Downs
Level 28 Thunder Cloud
Begin using Thunder 2 in regenerative phase instead of a second Blizzard or Scathe
Whenever Thunder Cloud procs, use your highest thunder spell, it will apply the entirety of the the damage over time at once and then reapply the DOT effect allowing more procs. This is a huge DPS boost, the only reason to omit a thundercloud boost is for enmity or astral/umbral reasons. With enmity the use of thunder 2/3 on other targets will suffice, for astral/umbral reasons I will leave it up to you to decide whether its worth the hard cast. I would say no but that depends on swiftcast.
Level 28 Single target
Fire 1*>Transpose>Blizzard 1>Thunder 2 or Scathe>Repeat
Level 28 AoE
Fire 2*>Transpose>Blizzard 1>Thunder 2 or Scathe>Repeat
Manaward
See Restricted Cool Downs
Convert
See Restricted Cool Downs
Black Mage (Level 30-60)
Single target at 34
Fire 3>Fire 1*>transpose>Blizzard 1>Thunder 2 or Scathe>Repeat
Aoe Combo at 34
Fire 3>Fire 2*>Transpose>Blizzard 1>Thunder 2 or Scathe>Repeat
Aoe Combo at 35
Fire 3>Fire 2*>Transpose>Freeze>Freeze>Repeat
Use blizzard 3 in the same slot as a "transpose>blizzard" as it is effectively both spells, finish fights with blizzard three to gain full MP into next fight.
Single target at 38 **No more transpose**
Fire 3>Fire 1*>Blizzard 3>Thunder 2 or Scathe>Repeat
Aoe Combo at 38 **may use old combo til 40**
Fire 3>Fire 2*>Blizzard 3>Freeze>Repeat
Level 40 Astral and Umbral 3, Read above if you havent
Single target and Aoe combo same as 38
Sustaining stack combo
Fire 3>scathe if necessary>Blizzard 3>scathe if necessary>Repeat
Strategy: Use during more mobile fights to avoid a true hard cast of either and keep your stacks. Return to normal combo when mobility becomes less required. Also employable if target is near death as to leave combat with full Umbral or Astral into next fight.
Apocatastasis
See Restricted Cool Downs
Lethargy
see Unrestricted Cool Downs
Manawall
See Restricted Cool Downs
Thunder 3 **replaces thunder 2 in all combos**
Firestarter
Strategy: Allows fire 1 to proc a free instant fire 3. Worth canceling your fire 1 over and you should do this by taking a step if you see proc after you kept spam casting. Dont wait for fire 3 proc to show up after every cast as it will bring down your DPS. Merely use the cancellation step and cast it when you see the proc. ALWAYS use when up.
Aetherial Manipulation
See Unrestricted Cool Downs
Flare
Strategy: flare is...interesting. Flare utilizes all your remaining MP to deal a devastating AoE attack. Note three things: Flare is alike to Fire 3 in which it removes umbral ice and places astral fire 3 on you; only roughly 10% mp is required to cast it, your mp will empty no matter what and transpose will be required to switch you to umbral ice unless you use convert>blizzard 3. Flare is only worth casting on a single target with swift cast, otherwise it is a DPS drop as a hard cast. Flare is worth hard casting on multiple targets. You may utilize convert to get two consecutive flares. If you are to cast flare I highly recommend using swift cast. You may omit the use of flare if the flow ruins your DPS but I recommend learning how to utilize it as it is a signficant boost when properly used. Possible combos below.
Level 50 single target
With swiftcast off cool down:
Fire 3>Fire 1 until 10% MP>Swiftcast>Flare>Transpose>Blizzard 3>Thunder 3
until swiftcast is back off cool down use old combo
Level 50 Aoe combo
Fire 3>Fire 2 until 10% MP>Swiftcast*>Flare>Convert**>Flare**>Transpose>Freeze>Freeze>Repeat
* means if available
** means if desired
Ley Lines
See Restricted Cool Downs
Sharpcast
See Restricted Cool Downs
Enochian
See Unrestricted Cool Downs
Blizzard 4
Strategy: Takes place before Thunder 1/2/3 in rotation to sustain enochian. Thunder 1 is viable now as cast times are so large at level 60 and time is crunched. You may need to shorten your burn phase and switch to regenerative phase via Blizzard 3 to use Blizzard 4 to sustain enochian before getting Fire 4. Blizzard 4 will not sustain or contribute Umbral Ice and requires Umbral Ice to be used.
Rotations
Change "Blizzard 3>Thunder 3" for "Blizzard 3>Blizzard 4>Thunder1/2/3"
Change "Blizzard 3>Freeze" for "Blizzard 3>Blizzard 4>Freeze*"
* means may omit and return to burn phase
Fire 4
Strategy: Takes place of Fire 1 in rotation for the most part. Use Fire 4 twice and the Fire 1 to sustain your Astral Fire stacks. Fire 4 does not provide the Astral Fire and does require it to be used.
Rotations
Replace "Fire 1*" with "Fire 4>Fire 4>Fire 1>Fire 4>Fire 4"
Single Target
Fire 3>Fire 4>Fire 4>Fire 1>Fire 4>Fire 4>Blizzard 3>Blizzard 4>Thunder 1/2/3*>Repeat
Use Firestarter Procs immediately as usual. They simply delay the normal flow of the rotation they dont change it and the delay of one instant cast shouldn't break your enochian cycle if you are prompt. Thunder Cloud Procs require you to move to a Fire 1 sooner as they take up a cast. Use them within Fire phase or after Blizzard 4 in Thunder slot. You may omit thunder completely even though it is a DPS drop if it is too much to manage until your skills develop as Fire 4/Blizzard 4/Enochian are more important. Remember you can screw up every minute and get back into enochian (or push dps and get back enochian) but above all (as always) avoid a true hard cast of Fire 3 or Blizzard 3 (losing astral or umbral stacks) as best as possible.
Unrestricted Cool Downs
Sure Cast
Strategy: use for guaranteed spell cast, uninteruptable by damage. Does not allow you to move while casting or be unaffected by line of sight or not facing your target. Use as you please or not at all, its not a major mechanic except in solo play.
Lethargy
Strategy: Mostly used in pvp but may be used in pve to slow a target down without using blizzard. For PVE you dont even need to use this ever and can never hot key it.
Aetherial Manipulation
Strategy: Use for fun, use to dodge mechanics, feel free to use however you desire as any gameplay will not require use of this skill.
Enochian
Strategy: Keep up all the time preferably through Blizzard 4 but through the actual skill as well.
Restricted Cool Downs
Swiftcast
Strategy: use to for high cast time moves such as Fire 3/Flare or when high mobility requires it to sustain Astral/Umbral stacks. It is ill advised to use this whenever it is available, save for when its needed or boosts dps significantly.
Manaward
Strategy: Use this in conjunction with Manawall to protect yourself against inevitable hits. Save for when damage is guaranteed to come in or if your become low on health.
Convert
Strategy: You may use convert in 3 ways during your career as Black Mage. The first is to save it for if/when you screw up your rotation and need MP to maintain casting/damage. The second is to sustain your burn phase for longer when in conjuction with something like raging strikes. The third is to use after a flare to begin flare again or enter Umbral stage full force.
Apocatastasis
Strategy: Place on tank to reduce their incoming magic damage, useless if no such damage is dealt. Viable in trash fights as well unless a magic boss is coming up. Use in Conjunction with Eye for an Eye is recommended.
Manawall
Strategy: use in conjuction with manaward for damage prevention. This one is a phsyical damage shield so it will be more useful than manaward.
Ley Lines
Strategy: save for when you know a stationary stage will occur in the fight. You can use this in trash fights but I recommend saving it for the boss if they are near. Use in conjuction with dps buffs and use at the beginning of your burn phase or after fire 3
Sharpcast
Strategy: Sharpcast is complicated. You can use it in 3 fashions. The first is a mistake correcter to supplement swift cast. You can use it to get a guaranteed Firestarter Proc off Fire 1 for a free instant Fire 3 (You may save this to cast in the middle of your burn phase to restart burn phase with the free instant fire 3 after regenertative phase IF you are within ley lines or if you omit thunder). You may do the same everytime it is available for the MP efficiency. Or you may use it with thunder to get a free Thunder 3 on the same or different target. NOTE: a good dps strategy is to use sharpcast to apply thunder to multiple target in trash fights for more thunder cloud procs.
Macros and UI Help
Do not rapidly press macro buttons, this will start them over and over and will screw up many of their workings. Macros also do not work with forgiveness zones, meaning pushing it .25 seconds from when Global Cool Down is over, will not push the action through. Global Cool Down must finish completely before a macro (that uses an on GCD ability) can be processed, making them slightly slower (cool downs and off gcds function fine). A well-controlled use of hotkeys is needed for macros, otherwise they are diminished. Furthermore macros can at shortest work in terms of half seconds, anything shorter will cause abilities to not go off.
To be more aware of when your Cool Downs are Available for use again consider one of the two following methods
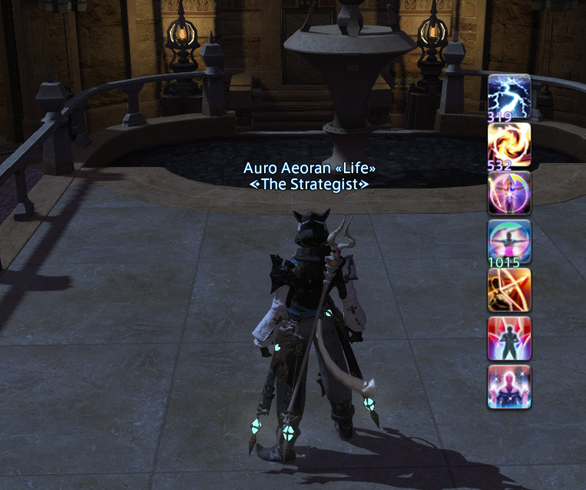
Visual (PC): enter your HUD layout through the system menu. Place a hot bar nearer to the center of your screen but far enough away you have enough visual space to see your character. Make this hot bar larger using CTRL+HOME. In this bar place a secondary icon of the abilities you wish to know the availability of, whether they be Cool Downs, Off GCDs, or Procs. The following is an example.
Audio: Use a macro on the ability to inform you when its cool down has passed.
/macroicon “Ability”
/ac “Ability”
/wait # (put the recast time in seconds or a few second short to warn you early for reaction time)
/e Ability is ready <se.#> (pick a number for the sound effect you desire)
You’ll need to replace quotes “ “ in game
Raging Strikes Macro
/macroicon "Raging strikes"
/ac "raging strikes" <wait..5>
/ac "quelling strikes"
Manawall/ward Macro
/macroicon manawall
/ac manaward <wait..5>
/ac manawall
Eye for Eye macro (combined with sch, smn and whm so you can use it on all 4)
/macroicon "eye for an eye"
/ac "Eye for an Eye"
/ac "eye for an eye" <tt> <wait..5>
/ac "apocatastasis" <tt>
/ac "Deployment Tactics"
/ac "Deployment Tactics" <tt>
Virus macro
/macroicon virus
/ac virus <t> <wait.1>
/p Virus used on <t> <se.1>
Sleep Macro (combined with whm so you can use it on both)
/p sleeping <t>
/mk bind1
/ac repose
/ac sleep
All things Blizzard Hotkey (will use highest available, work with level 58 combo)
/macroicon "blizzard III"
/ac "Blizzard IV" <wait..1>
/ac "Blizzard III" <wait..1>
/ac "Blizzard"
All thing Thunder hotkey (will use highest available)
/macroicon "Thunder III"
/ac "Thunder III" <wait..1>
/ac "Thunder II" <wait..1>
/ac "Thunder"
Do not rapidly press macro buttons, this will start them over and over and will screw up many of their workings. Macros also do not work with forgiveness zones, meaning pushing it .25 seconds from when Global Cool Down is over, will not push the action through. Global Cool Down must finish completely before a macro (that uses an on GCD ability) can be processed, making them slightly slower (cool downs and off gcds function fine). A well-controlled use of hotkeys is needed for macros, otherwise they are diminished. Furthermore macros can at shortest work in terms of half seconds, anything shorter will cause abilities to not go off.
To be more aware of when your Cool Downs are Available for use again consider one of the two following methods
Visual (PC): enter your HUD layout through the system menu. Place a hot bar nearer to the center of your screen but far enough away you have enough visual space to see your character. Make this hot bar larger using CTRL+HOME. In this bar place a secondary icon of the abilities you wish to know the availability of, whether they be Cool Downs, Off GCDs, or Procs. The following is an example.
Audio: Use a macro on the ability to inform you when its cool down has passed.
/macroicon “Ability”
/ac “Ability”
/wait # (put the recast time in seconds or a few second short to warn you early for reaction time)
/e Ability is ready <se.#> (pick a number for the sound effect you desire)
You’ll need to replace quotes “ “ in game
Raging Strikes Macro
/macroicon "Raging strikes"
/ac "raging strikes" <wait..5>
/ac "quelling strikes"
Manawall/ward Macro
/macroicon manawall
/ac manaward <wait..5>
/ac manawall
Eye for Eye macro (combined with sch, smn and whm so you can use it on all 4)
/macroicon "eye for an eye"
/ac "Eye for an Eye"
/ac "eye for an eye" <tt> <wait..5>
/ac "apocatastasis" <tt>
/ac "Deployment Tactics"
/ac "Deployment Tactics" <tt>
Virus macro
/macroicon virus
/ac virus <t> <wait.1>
/p Virus used on <t> <se.1>
Sleep Macro (combined with whm so you can use it on both)
/p sleeping <t>
/mk bind1
/ac repose
/ac sleep
All things Blizzard Hotkey (will use highest available, work with level 58 combo)
/macroicon "blizzard III"
/ac "Blizzard IV" <wait..1>
/ac "Blizzard III" <wait..1>
/ac "Blizzard"
All thing Thunder hotkey (will use highest available)
/macroicon "Thunder III"
/ac "Thunder III" <wait..1>
/ac "Thunder II" <wait..1>
/ac "Thunder"
